This option enables you to sort the rows in the table and chart by
one or more chart variables.
.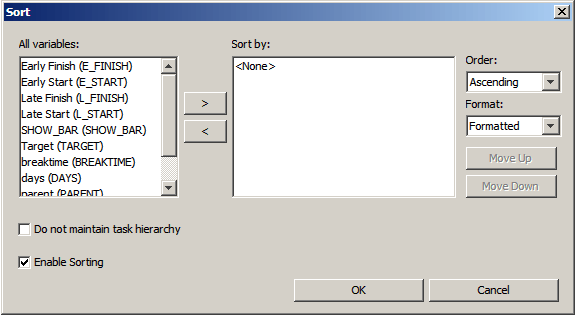
The Enable Sorting check box enables and disables the sorting feature in your chart. Sorting is enabled by default. To disable the sorting feature, clear the Enable Sorting check box, and then click OK. When Enable Sorting is cleared, the controls on the Sort dialog box are disabled.
Note: Disabling sorting also disables zoning. If you want to create zones in your chart, do not disable sorting. Disabling sorting also disables the Layout controls on the Columns tab of the Table dialog box, which is opened with the Format  Table option.
The chart variables on which you can sort are listed under All variables. To sort on a variable, make sure that Enable Sorting is selected. Select the desired variable in the All variables list, and then click the right-arrow button. The selected variable is moved under Sort by. Repeat the process for any additional variables on which you want to sort. When you sort on multiple variables, a multilevel sort is performed starting with the first variable in the Sort by list.
You can modify the Sort by list or change the sort order for individual variables as needed. To move an item in the Sort by list, select the item that you want to move, and then click Move Up or Move Down. To remove an item from the Sort by list, select the item that you want to remove, and then click the left-arrow button. The selected item is moved back to the All variables list and the sort on that variable is undone. To change the sort order for a variable, select the variable in the Sort by list, and then select Ascending or Descending under Order.
For formatted values, such as dates, you can sort on the formatted (string) or unformatted (numeric) value. To sort on the numeric value of a formatted variable, select the variable in the Sort by list, and then select Unformatted under Format. To sort on the string value, select Formatted instead.
Note: The Format option is enabled for formatted variables only.
To maintain the task hierarchy in the chart table, clear Do not maintain task hierarchy. When cleared, sorting occurs within each parent task in the table, and the task hierarchy is maintained. When selected, sorting occurs over the entire chart and the task hierarchy in the table is lost.
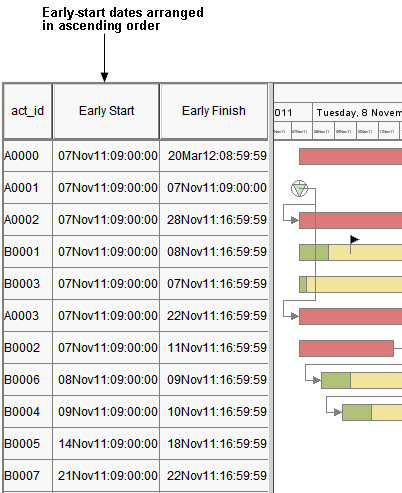
For example, the following display shows the chart sorted in ascending order by the
unformatted Early Start variable with the Do not maintain task hierarchy option selected.
Notice that no hierarchy of tasks is displayed. The Do not maintain task hierarchy option causes subtasks with different parents to be grouped together. To restore the hierarchy, clear Do not maintain task hierarchy.
When Enable Sorting is selected, you can also sort the chart by clicking a column heading in the chart table. Clicking a column heading adds the column to the Sort by list and performs the sort automatically. You do not have to open the Sort dialog box in that case. The actual behavior of the sort depends on the settings of Order, Format, and Do not maintain task hierarchy on the Sort dialog box. Clicking a table heading when Enable Sorting is cleared has no effect on the chart.
Note: If you accidentally click a table heading when sorting is enabled, the chart order might change. In that case, to restore the original order, you must open the Sort dialog box and remove the heading from the Sort by list. To prevent unintentional sorting, you can clear the Enable Sorting check box on the Sort dialog box.
To save the sort settings, select File Save Preferences.
This option enables you to draw a horizontal line across the chart where the value of selected
variables in the chart changes or at selected nesting levels in the table tree.

The status of the zoning feature is determined by the status of the sorting feature. When sorting is disabled, zoning is disabled, and when sorting is enabled, zoning is enabled. When zoning is disabled, the left arrow button and right arrow button on the Zone dialog box are disabled. In that case, to enable zoning, you must open the Sort dialog box and enable sorting. See Project Sort.
To add a zone, select a variable in the Variables list or a tree level in the Tree levels list, and then click the right-arrow button. The selected item is moved to the Zone by list, and horizontal lines are drawn on the chart to indicate the zones. Repeat the process to add additional zones. To move an item in the Zone by list, select the item in the list, and then click Move Up or Move Down.
To remove a zone, select the variable or tree level in the Zone by list, and then click the left-arrow button. The item is moved back to the Variables or Tree levels list, and the horizontal lines depicting that zone are removed from the chart.
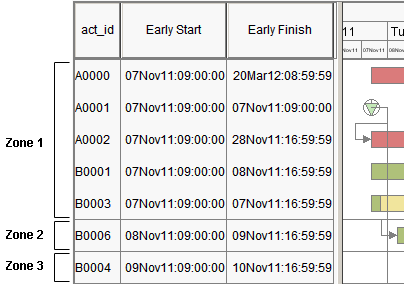
For example, the following display shows the chart zoned by the Early Start variable.
Notice that a horizontal line is drawn each time the value of the early start date changes.
You can use the Sort option to group together all the tasks having the same
value in a selected field, and then use the Zone option to draw a horizontal
line to show where there is a change of values.
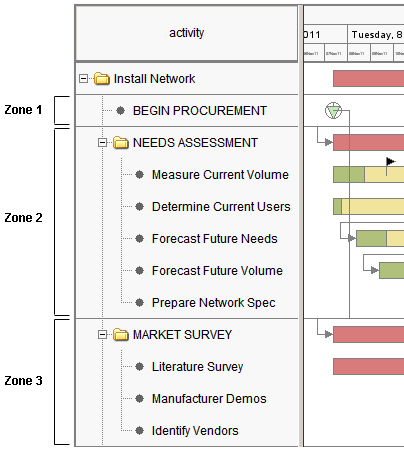
The Zone option also enables you to draw a horizontal line where the nesting level
of projects changes. The following diagram shows a chart zoned by project level Tree level 1.
Notice that the
horizontal lines that are drawn across the chart delimit the first-level tasks.
To save the zone settings, select File Save Preferences.