File Menu
Note: The File menu might not be available in some charts.
The File menu can include the following items:
File  Save
Preferences Save
Preferences
This option enables you to save the preferences that you have made with the other menu options: View, Format, and Project.
If the chart table includes a node tree, any changes that you have made to the tree (expanded or collapsed nodes) are
also preserved.
The next time the chart
is opened, your saved preferences are automatically applied.
Note: This option might not be available in some charts. When it is
available, it is possible that the author of the chart has
set the IGNORE_SAVED_STATE parameter in the HTML code to ignore certain saved preferences when the chart is opened, which means
that you might not see all of your saved preferences. For information about the IGNORE_SAVED_STATE parameter, see SAS/GRAPH: Interactive Schedule Viewer Applet User's Guide.
File Save As
This option enables you to save the current schedule data to a temporary data set that you can open later using the File Open Schedule Data option. You can use this option to save any changes that you made to the chart data using the Edit option in the chart table pop-up menu while not overwriting the chart data in the original data set.
Note: The File Save As option might not be available in some charts.
Note: This option is disabled when the schedule data is read from an XML file and when the ISV Applet cannot access the SAS server.
The File Save As option opens the Save As dialog box, which is shown in the following display.
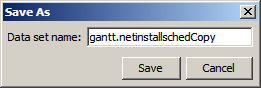
The Data set name text box in the Save As dialog box is automatically populated with a recommended data set name. The recommended name appends "Copy" to the name of the current schedule data set. You can change the name to any unique name that conforms to the SAS data set naming requirements. Make a note of the data set name that you specified, and then click Save. When you click Save, the current chart data is saved to a SAS data set that you can open later using the File Open Schedule Data option.
File Open Schedule Data
This option enables you to open a schedule that you saved earlier using the File Save As option or to reload the original schedule data.
Note: The File Open Schedule Data option might not be available in some charts.
When you select the File Open Schedule Data option, the original schedule data set and any data sets that you saved during the current viewing session are listed. An example is shown in the following display.
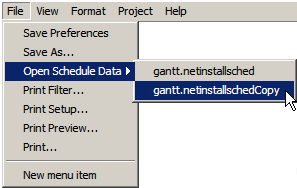
If no data sets have been saved during the current viewing session, only the original schedule data set appears in the list. Select the data set that you want to load. The ISV Applet loads the data set that you selected and updates the schedule display to show the selected data.
Note: The names of the saved data sets (if any) do not persist across viewing sessions. When you close the chart, the names of the saved data sets are discarded. However, the saved data sets remain on the SAS server where they were saved. If you need to access a previously saved data set, contact your on-site SAS support personnel for assistance.
File Print Filter
This option enables you to apply a filter to the chart during printing in order to print a portion of the schedule rather than the entire schedule. It opens the Print Filter dialog box, which is shown in the following display.
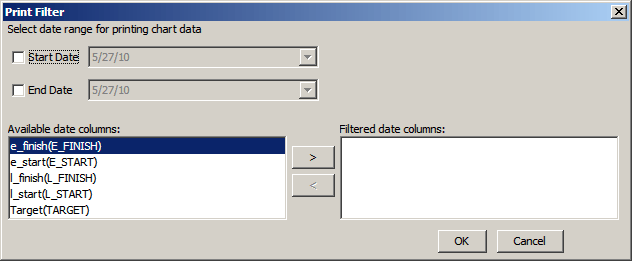
In the Print Filter dialog box, you can specify the criteria for your print filter. At a minimum, you specify a start date or end date, and at least one date column.
Note: If you do not specify the minimum criteria, filtering does not occur. The entire schedule is printed in that case.
Start Date and End Date enable you to filter on a specific window in the schedule. You must specify a start date, an end date, or both. Time stamps are not supported. To select a start date, click the Start Date check box to enable the date field. The date defaults to the current date. To specify a different date, click the down arrow to the right of the date field to open the date chooser, and then select the desired start date. The date that you select is inserted into the date field. To select an end date, click the End Date check box, and then select the desired date.
When you select a start date only, the events that start on or after the start date that you specify are printed. When you select an end date only, the events that end on or before the end date that you specify are printed. When you specify both, the events that start and end between the dates that you specify (inclusive) are printed.
To select a date column to filter on, select the date column in the Available date columns list, and then click the right arrow. The selected column is moved to the Filtered date columns list. Repeat this process for any other date columns that you want to filter on. To remove a column from the filter list, click the column in the Filter date columns list, and the click the left arrow. The selected column is moved back to the Available date columns list. Your Filtered date columns list must contain at least one date column. After you select your filter criteria, click OK. You can now preview the filtered chart or print it.
Note: If no activities meet the criteria that you specify, a blank schedule page is printed.
You should preview the filtered chart before you print it. To preview the filtered chart, select File Print Preview. Modify the filter criteria, if needed. To print the filtered chart, click Print in the Print Preview window toolbar, or select File Print from the ISV Applet toolbar menu.
The filter remains in effect only for the duration of the current viewing session. The filter is cleared when you close or reload the chart. The File Save Preferences menu option does not save the current filter criteria. To clear the filter in the current viewing session, on the Print Filter dialog box, uncheck the Start Date and End Date check boxes, and then click OK.
File Print
Setup
This option enables you to specify how to print the chart. It opens the Print Setup dialog box, which is shown in the following display.
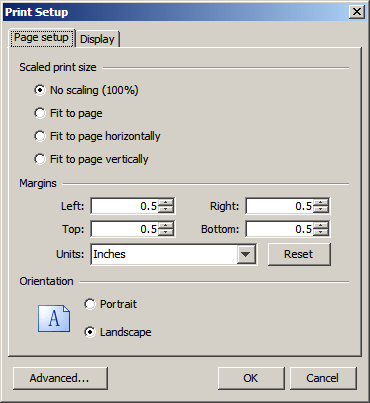
On the Page setup tab, you can specify the scaling, page margins, and page orientation. On the Display tab, you can specify whether to show the chart title, time axis, footnotes, and legend on each page.
The Advanced button opens the Advanced dialog box, which enables you to select the printer dialog box that appears when you select File Print. You can choose the operating system's native print dialog box or the Java print dialog box.
Note: The File Save Preferences menu option saves only the settings on the Page setup tab. It does not save the Display tab settings or the Advanced settings.
File Print
Preview
This option enables you to show how the chart will appear when it is printed. It opens the Print Preview window in which the chart as it will be printed is displayed. Use the toolbar at the top of the window to
preview and print the pages:
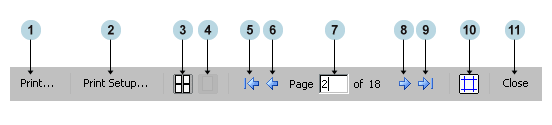
The toolbar controls from left to right do the following:
- Opens the Print dialog box.
- Opens the Print Setup dialog box.
- Displays thumbnails of all of the pages in the chart. You can double-click on a thumbnail to open only that page in the display.
- Displays the current page only.
- Displays the first page.
- Displays the previous page.
- Indicates the number of the current page. You can type a number in the field and press ENTER to display a specific page.
- Displays the next page.
- Displays the last page.
- Draws lines to denote the page margins. The lines do not appear in the printout.
- Closes the Print Preview window.
File Print
This option enables you to print the chart. In the Print dialog box, select the desired printer and options, and then click OK.
File Exit
This option enables you to exit the chart.
Note: The Exit option might not be available in some charts. If the Exit option is not available,
to close the chart, select
File Exit
from your browser's menu or click the window close icon (X) in the browser window.
Note: When you use the File Exit option, in some cases, the schedule display might not clear in the browser window, which might give the appearance that the applet or browser is not responding. In that case, you can select another link, or you can select File Exit from the browser menu or click the window close icon (X) to close the browser window.
|